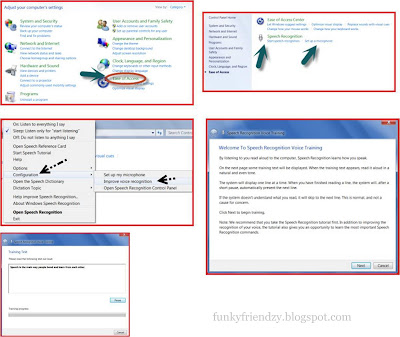
2. You should reach the screen as shown in image 1. Make sure you are viewing items “by category” on the top right corner, not as small or large icons. How To Start Speech Recognition in Windows 7
1. Let’s go to windows start menu and select control panel from the menu on the right.
2. You should reach the screen as shown in image 1. Make sure you are viewing items “by category” on the top right corner, not as small or large icons. 3. Now let’s go ahead and click “Ease of Access” as shown in image 1 above.
4. You will reach the screen shown in image 2 below. At this point, you can do two things – setup your microphone or start speech recognition straight away. In any case, it would be better to click on “set up microphone” option, and then run few tests on the microphone, check everything is all set and then click on “start speech recognition”. 5. The speech recognition screen will launch as shown in image 3. At the beginning it is in the sleep mode and will be displaying the word “sleeping”. 6. Just clicking on the “power up” button as shown in the arrow key, will turn it on as shown in image 4, and now it will display “Listening”. With this, you have actually put your PC in speech recognition mode and the PC will now try to understand every word you speak on the microphone. If you open a blank document in MS word and say something over your microphone, you will notice that the PC itself is typing texts as you speak. However, whether it types the right word or not, could be a different issue altogether. Before it could produce any acceptable quality texts from the sounds it captures, it is necessary to train the PC with the kind of tone and accent you have, so that the PC could learn and recognize your speeches accurately.
How To Train Your Computer To Recognize Your Voice
1. To do this training, right click the mouse button on the top left corner of the speech recognition screen as shown in the arrow in the above image.
2. You will see a top-down menu will appear. Select configuration from the menu and when it expands to the right side, choose “improve voice recognition” as shown in the image 5 below. 3. Another screen as shown in image 6 will pop-up at this point. Just click next on it, this will put up the speech recognition voice training window as shown in image 7 below. Speech Recognition Training Tips
During this training session, several sentences will appear one by one in sequence and you will have to speak them loud and clear so that the computer could get itself familiar with your style of speaking the words. There is a progress indicator on the same screen, and one should complete the entire step before quitting the training session.
As you have trained the computer to some extent, you may now open a blank MS Word document and say something on the microphone. This time, your computer should be able to recognize your voice lot better and be able to generate the texts from your speeches automatically. If you think more improvement is necessary, go ahead and carry on with the same training session once again, and then come back to MS Word and test the accuracy and improvement as you perform each cycle of training.
I must mention here that, if the gap between what you say on the microphone and how the computer recognizes them is too large after performing one cycle of speech training, it would be better not to waste time with the same PC / laptop and the microphone. As I said earlier, you need to be well equipped in terms of hardware, to get that working with a good degree of satisfaction.
No comments:
Post a Comment